rhme2 - Solving the whac the mole challenge
RHme2 (Riscure Hack me 2) was a hardware based CTF challenge started back in 2016. Although it’s already over you can download the challenges from their Github page.
All you need is an Arduino (or Arduino compatible) board with an atmega328p chip (Arduino UNO or Arduino Nano). In this post we will solve this challenge by brute forcing it using a second Arduino.
Stuff needed to solve this challenge:
- an Arduino Nano or UNO
- a second Arduino
- an oscilloscope
To flash the whac the mole challenge to an Arduino Nano execute the following command (from within ./challenges/binaries/whac_the_mole/ and avrdude in your path):
avrdude -c arduino -p atmega328p -P /dev/ttyUSB0 -b57600 -u -V -U flash:w:whac_the_mole.hex
Note: If you want to flash it to an Arduino UNO you need to adjust the baud rate in the command to 115200.
The first thing to check is if there is anything being sent via the serial interface. We could just bruteforce the baudrate used by the firmware but as we already need an oscilloscope for this challenge let’s go the l33t way.
UART uses the RX and TX pins - RX is the receive and TX the transmit pin. So if we hook our oscilloscope to the TX pin of the Arduino Nano we can see some data being sent after hitting the reset pin. If you connect your Arduino Nano to a PC via USB the output will also show up in the serial console.
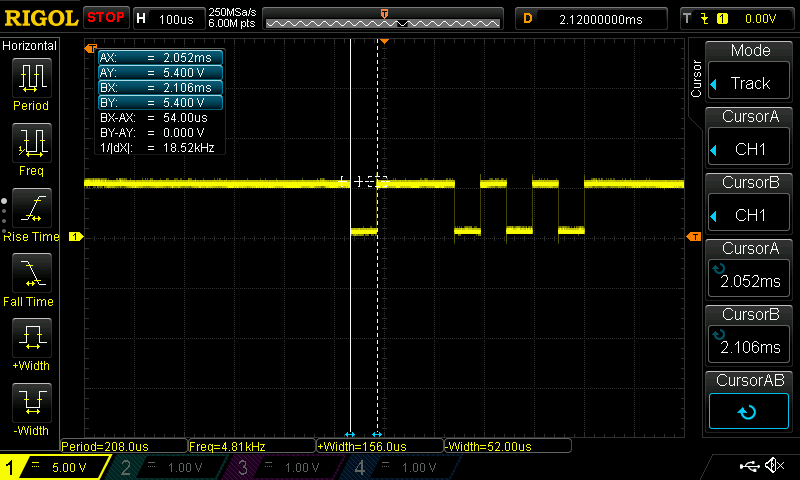
If data is sent via the serial protocol the voltage drops from HIGH (+5V) to LOW (0V). So we set the oscilloscope trigger to falling edge, enable single shot mode and press the reset pin on the Arduino. We now have some data packages and need to extract the baud rate from it. The first drop from high to low on each package is the start bit followed by the data and the stop bit. By zooming in on a package we can measure the width of the shortest pulse and simply calculate 1/width or simply read the data on the oscilloscope. The width in this example is 54µs so the calculation is 1/(54*10^-6) which gives 18518.5185185 (18.52k which can also be read from the oscilloscope).
Note: Be careful when connecting the oscilloscope - look here why you should be careful
Now simply round this value to the next standard baud rate and give it a try. My oscilloscope has a built in RS232 decoder so we can directly try to decode it and see the data.
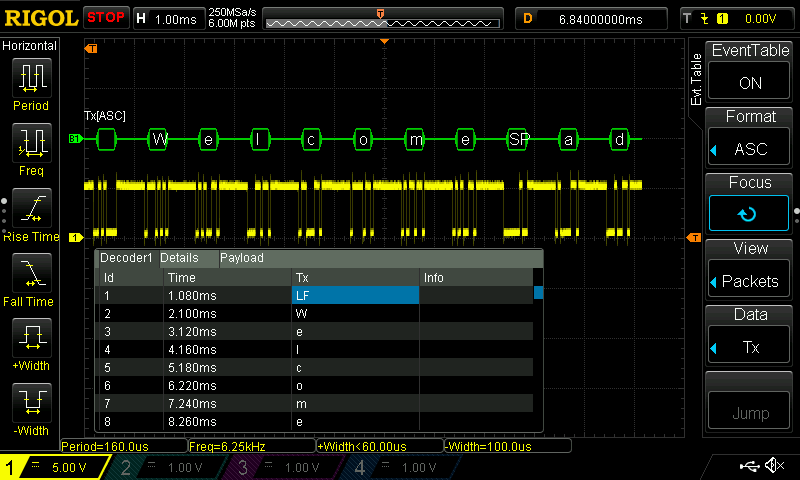
YAY! So we found the correct baud rate: 19200.
Next connect the Arduino to your PC’s serial monitor using the determined baud rate and give the challenge a try. You have to press enter, a countdown with the words Ready? Get set! GO! starts and quickly states we have failed (You missed it. Try again by pressing <Enter>.). After trying all sort of inputs via the serial console it seems that there is no direct user input via the serial interface except the newline to start a new try.
As the challenge name states this seems to be a “whac a mole” game. We most likely have to hit some moles but how? Maybe this is a pure hardware challenge? Let’s see.
By hooking up the oscilloscope to every digital output pin of the Arduino Nano and pressing Enter on the serial console we can identify some pulses being sent on pin D13. On the following screenshot you can see the TX pin on channel 1 (yellow) and the pulses sent by the Arduino Nano on channel 2 (blue).
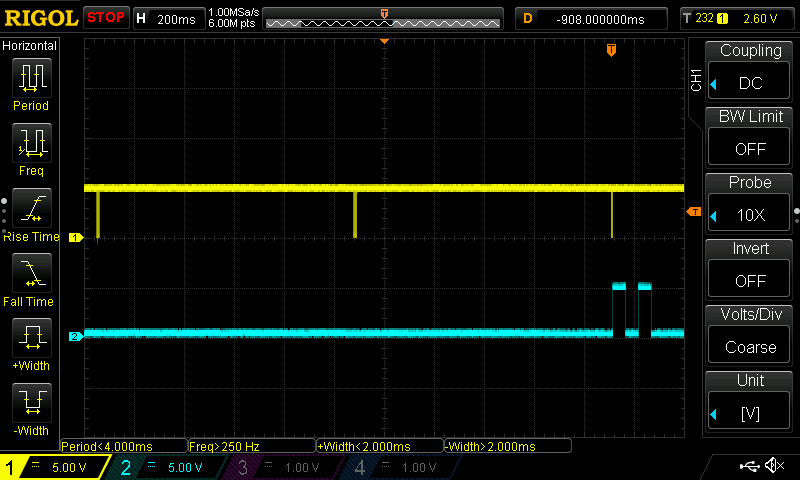
The 3 yellow spikes are the Ready?, Get set! and GO! messages immediately followed by 2 short pulses on pin D13. We can also see the LED on the Arduino is flashing exactly the number of pulses being sent on the pin.
By doing a lot boot cycles and capturing data with the oscilloscope there only seem to be 1 to 6 peaks sent on this pin.
If this is a pure hardware challenge we might have to hit a specific mole hole mapped to the number of pulses.
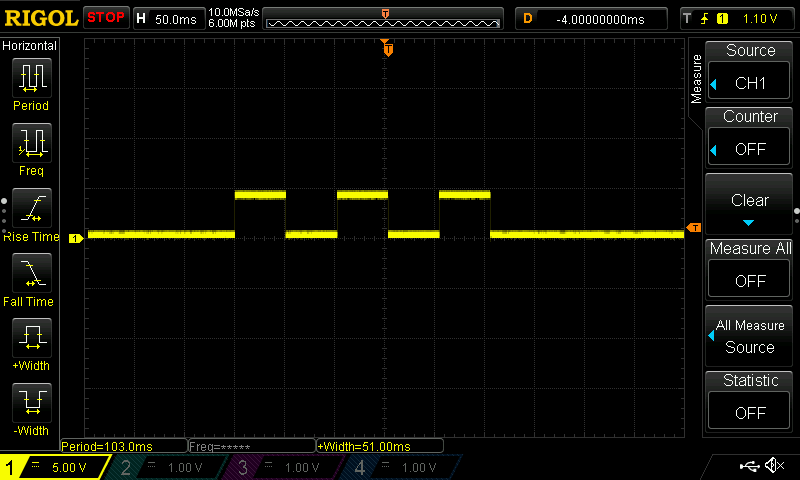
By zooming in on one of the pulses sent on pin D13 we can see the pulse width is about 51ms (bottom of the screenshot).
So I hooked up my Arduino UNO to some of the digital pins and set random pins to HIGH and LOW with a 50ms delay to generate the same pulse as we observed to determine the behavior.
After some time and shitty code I had luck and after sending a pulse to the correct pin a second set of pulses appeared on pin D13. \o/
At first I tried to manually brute force the corresponding pins for each number of pulses but oddly it seems like the pins are randomized on each power up of the Arduino Nano - so I had to find another way.
My way of doing it was the good old dirty brute force way: I hooked up the TX and RX pins of the Nano to some digital pins of my UNO and created a so called SoftwareSerial interface to communicate with the Nano’s serial interface instead of connecting a PC. I also connected the Nano to the 5V output of the UNO so it runs completely standalone and needs no connected PC. Next I hooked up all digital pins from the Nano to my UNO and started monitoring the D13 pin for peaks and brute force the correct pin order. This was an extreme coding challenge for me as I haven’t written C code for a long long time.
Also the timing on this one is very important so I had to set a relative exact pulse width to determine when no more pulses are sent otherwise the challenge fails because we have waited too long with the next input.

And here is the wiring diagram (click for a larger version):
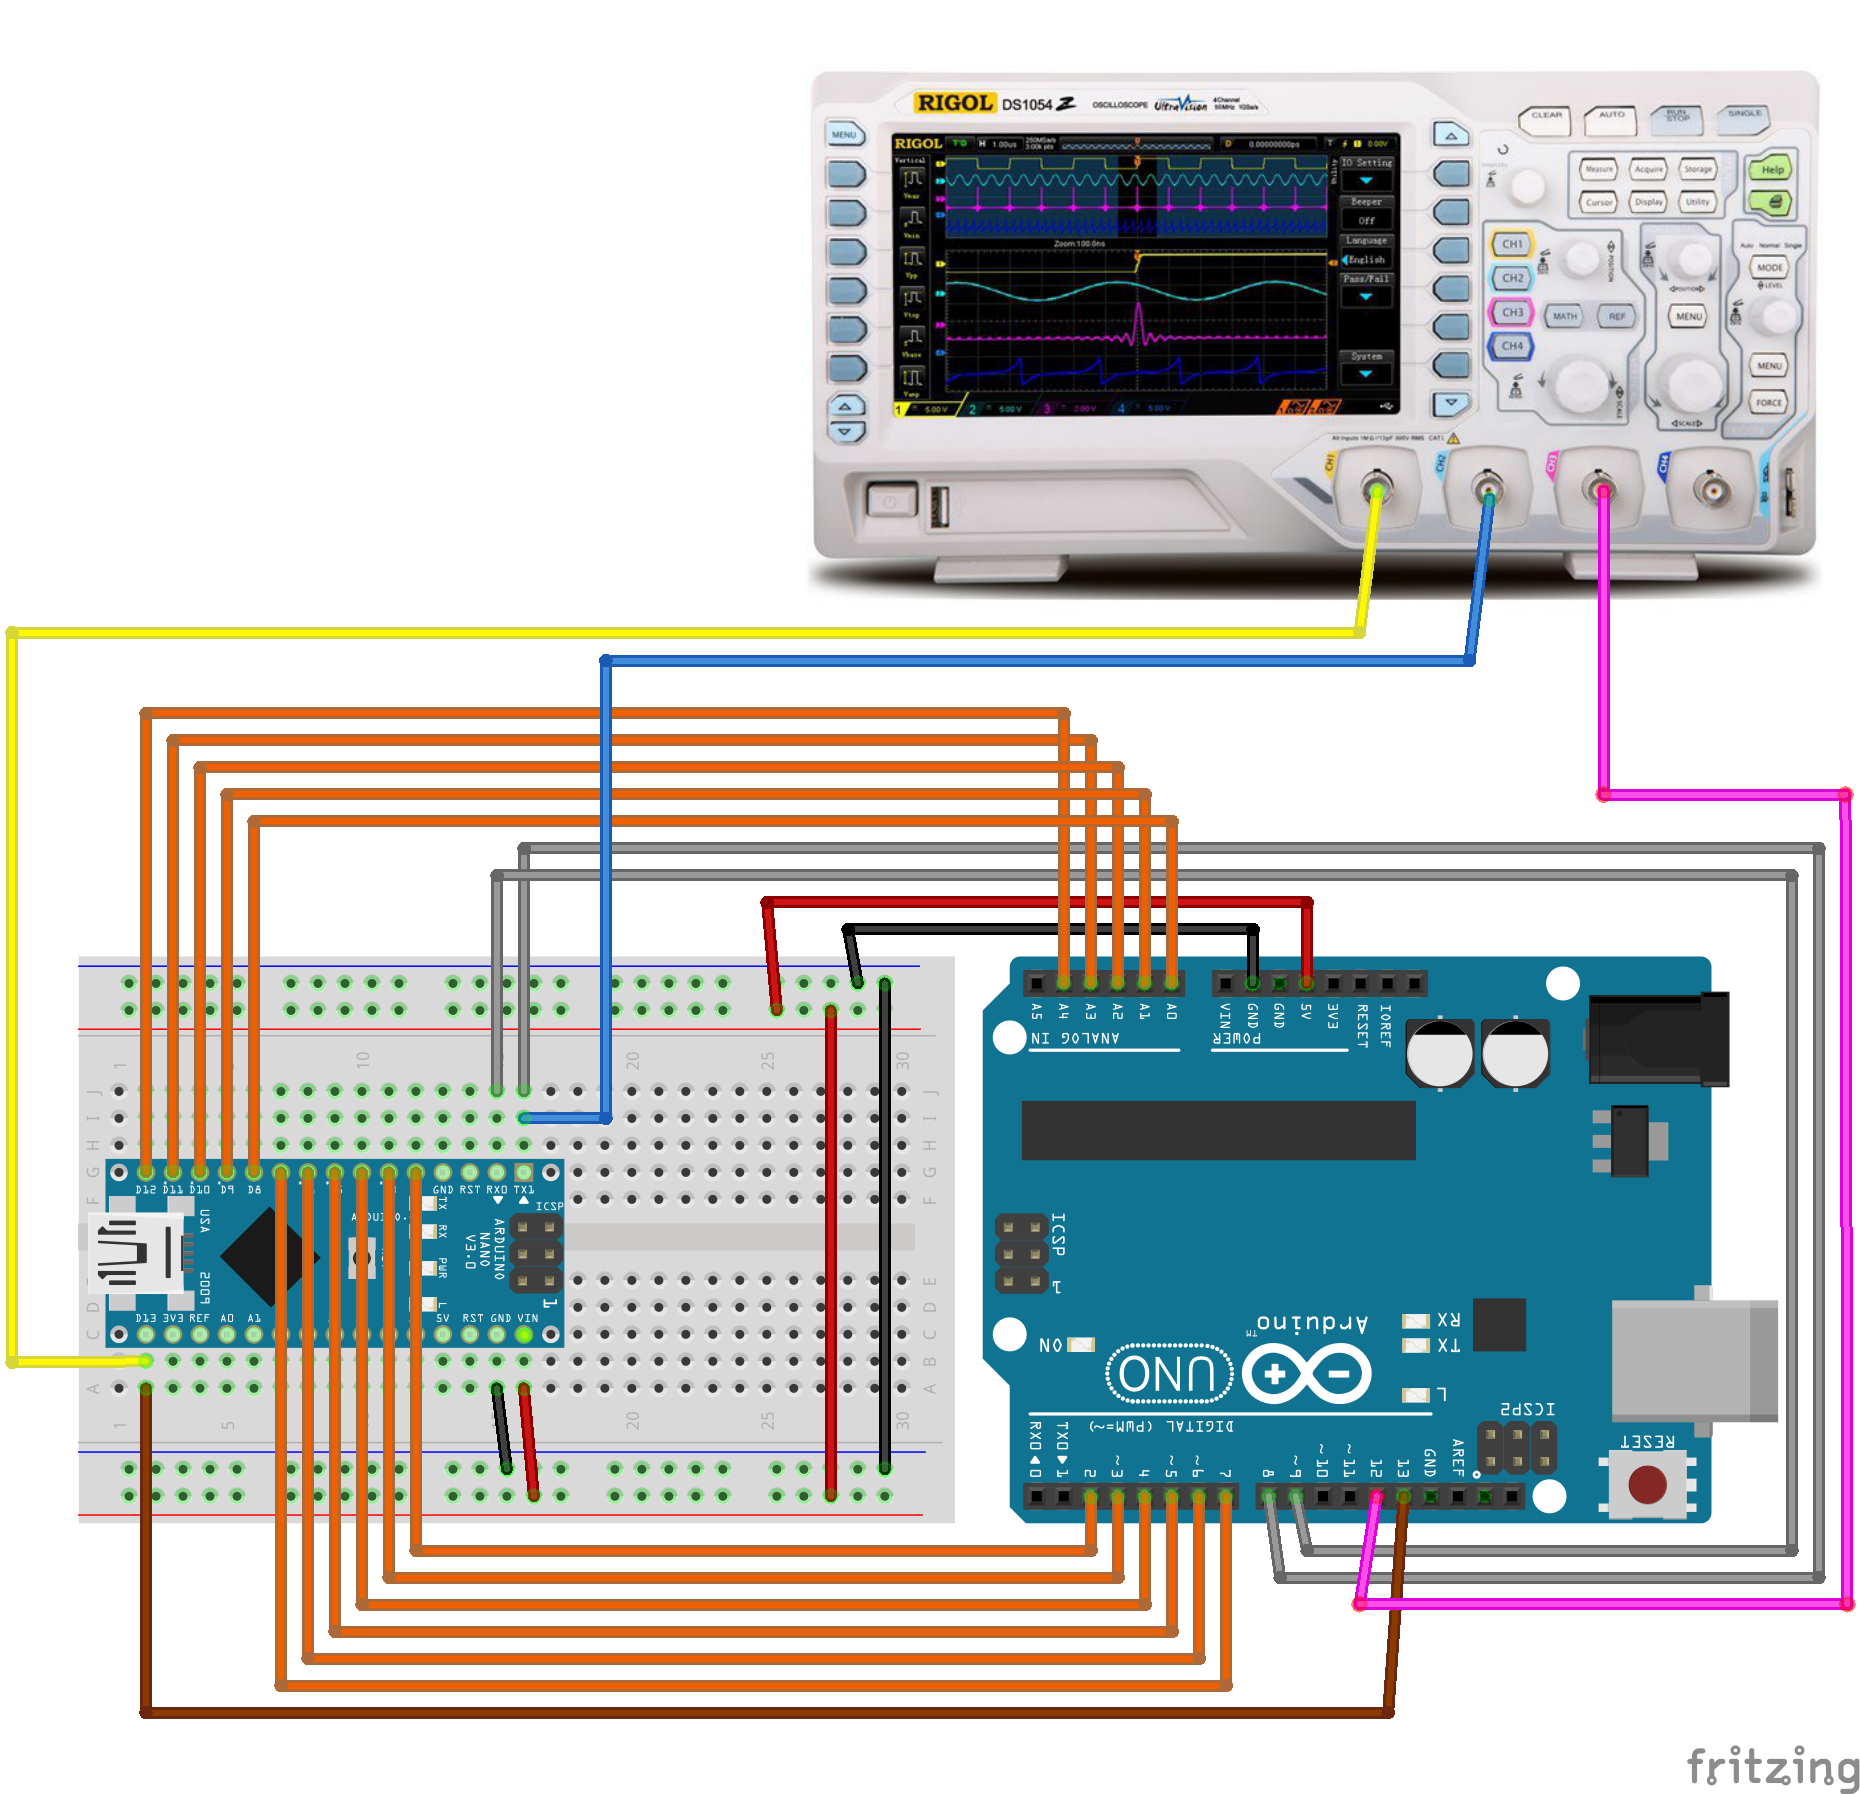
After some minutes of running the pin order was correctly solved and all 50 mole holes where hit correctly and the final message is shown on serial output of the UNO (the challenge does not contain a flag any more).
I put my code up on my Github page if you are interested: https://github.com/firefart/rhme2
Here you can see a video of the complete brute force running on my oscilloscope in rolling mode (sorry for the poor framerate quality). Channel 1 (yellow) shows the pulses sent on pin D13, Channel 2 (blue) is hooked up to the serial transmit pin and shows when the messages are sent and Channel 3 (magenta) shows when I send a pulse back (I added a monitoring pin and sent a seperate pulse to it). At the end of the video (around 02:20) you can see how the UNO hits all correct mole holes. On the right side I also included the debug output from the Arduino UNO so you can see what’s going on.